Showing posts with label craft project. Show all posts

Monday, January 12, 2015

No Sew Leg Warmers and Gloves!!

Need a fun and cheap project to make with your kids?  Well, how about no sew leg warmers and gloves!!

We bought adult sized knee socks from Walmart. One package of 3 pairs was $4.77 and look!!


Aren't these girls adorable!!

Here are a few pictures of the process below.  

Click HERE to go to a tutorial on how to make your super easy no sew leg warmers and gloves!


Have fun!

Cold Weather Running Just Got A Little Easier!

One of the things hardest parts of running in the winter is the cold and the residual cold left on the hiney! You would think that since I have plenty of body fat, I wouldn't be so cold, but I am!

Well, my sister mentioned that a friend of hers made a bum warmer.. and that intrigued me, so I created one for myself and a few to share with friends!

They are amazing!Here are a few pictures and a link to the tutorial I made.

Here is the warmer on. It's a little wraparound skirt in fleece.. or maybe more like a backwards apron!


The warmers I made are between 10-12 inches in height and 36 inches in width plus the ties. I didn't want them long enough to interfere with running and I didn't want to have to fight the material with every step, so the fabric doesn't meet in the front.

Here are my running buddies on Dec.31st. It was 18 degrees out! We happily wore our bum warmers!


Ready to make yours? CLICK HERE for the link

I've worn mine a half a dozen times and love it. I even wore it in the rain one day and the water just pilled on the fleece and didn't soak me! Love!

Friday, May 10, 2013

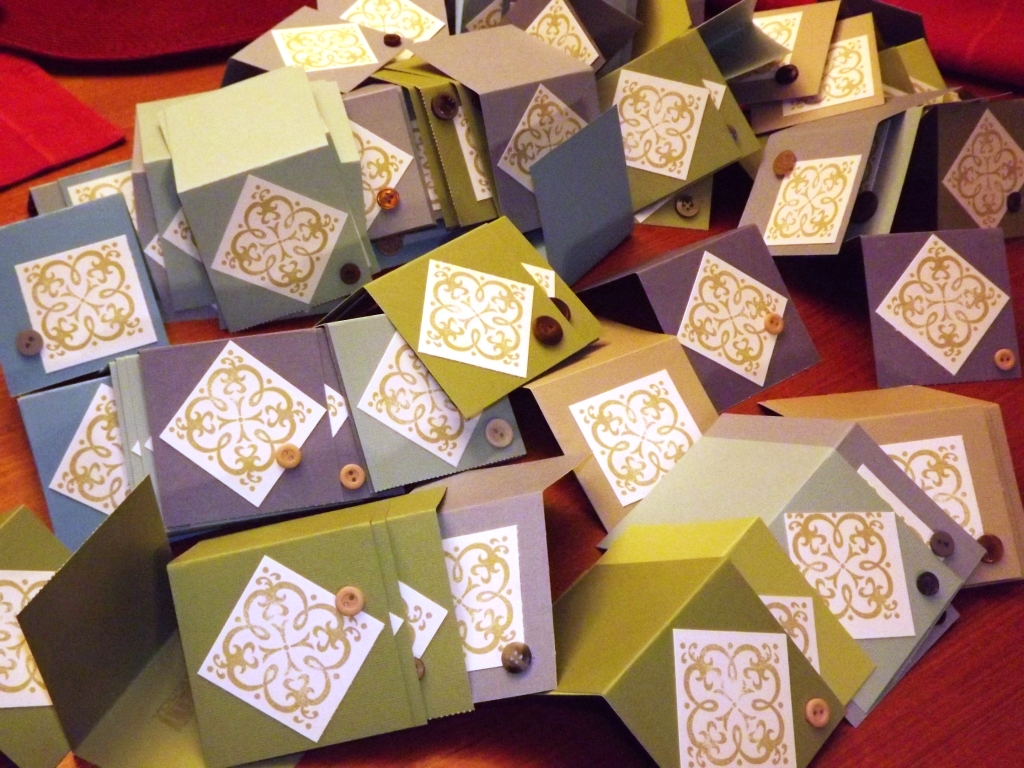
136 cards in 2 1/2 hours

Since moving into our new house, I haven't had a place to create or craft. The house is wonderful and everything our family needed, but I lost my craft desk and space. sad face. Last night I was feeling blah and just needed to create something!

In honor of Teacher Appreciation Week and feeling left out since high school teachers don't get the love that elementary teachers receive. We get a paycheck, that's about all the love we get. (told you I was blah) I decided to make cards for my fellow high school staff members. I've done this before, but not in a couple of years?? wow. that's a long time.

So.. back to the cards. I got everything out and at 8pm started making cards. I had helpers that asked lots of questions and wanted to touch things. But I'm pretty efficient and started cutting paper. I make 3"x3" cards as they are cute, cost effective and they fit in our mailboxes at school.

If you plan on ever making bulk cards, I suggest cutting the paper first. I randomly chose paper that kinda of coordinated, but really I just wanted all of the cards to look decent with one color of ink. Simplicity is the key to bulk cards! Cut all of the 3"x6" strips and then the 2"x2" accent paper. Then fold the cards.

Next get ready to stamp. I stamped the sentiment first. I knew the sentiment that I wanted, but it took me a few different tries to decide on my accent stamp.


Next I stamped the accent stamp and then flipped the pieces over, applied tape to 20 or 30 squares at a time and adhered to the front. I varied the placement on the front of the card.

Now that the cards are made, it's time to embellish.


It is important at this point to just go with the flow. I use glue dots and just put coordinating buttons on the roll of glue dots about 20 at a time. Pick up a button and put it on the card. DO NOT LINGER on this step :)!!

And there you have it. 136 cards in 2 hours.


This morning, I ran to the store and picked up a bag of mixed chocolate miniatures. These are perfect for the inside of these cards. I rolled the glue runner on about 20 cards at a time and slapped a piece of candy down.


 And there you go!
All in it was about 2 1/2 hours. Not bad for a last minute project!

Paper, stamps and ink are Close To My Heart.

Wednesday, April 10, 2013

Help me decide.. which one should I make for the race?

I am running in another half marathon on Sunday. It's 13.1 miles. {just in case you didn't know :) }
This race I am running by myself as my running group is running the full marathon.  I've decided to make a shirt for myself.

Which one do you like better?

Both options are for the BACK of the shirt.

Option 1:
Option 2:


I'm not sure about the color yet. I'm going to go by a technical shirt at walmart and go from there.

Or do you have any other ideas for me?  I'd love them.

Saturday, September 15, 2012

Warning: A Possible New Addiction

For all of you out there that enjoy Pinterest. I have to ask you. Have you tried Craft Gawker?

Maybe this is old news for all of you, but I just recently stumbled on it. 


It's quite possibly my new addiction.

Why, becasue it's all crafty diy stuff on it.

So if you haven't looked at it yet, go check out www.craftgawker.com  It's pretty cool!
 

Thursday, July 12, 2012

The Frame Project, Part 1

I have some old frames. Okay, I have LOTS of old frames. The kind that no one actually wants to use anymore. They take up space. In fact, for a couple of years, they were pretty much the only thing in a storage building. SAD.

I am on a mission to find a use for these things. And, I think I've come up with plan.
My sister Libby and I were brainstorming for a craft fair that is coming up this fall at her school. After discussing the decorating styles of the area and things people purchase... I have come up with something really cute!!

Just wait!

Here are the frames stacked up and taking up space.

 The befores. Really, they are pretty bad.


And here is after step 1.
I LOVE the blue. But the navy just CALLS to me!!


The red is nice too.

And man, don't you just see the silver in your house ? :) Okay, maybe not yet, but you will when I'm finished. Remember, this is just part 1!


Here they are drying. Nine painted and tons more ready. I've got to get more navy spray paint!


I can't wait to show you what I'm going to make these into!! Can you guess?

Tuesday, May 15, 2012

Painted Vases. Super Cheap, Big Impact


Love them.

I made 52 vases for the teacher appreciation banquet.
They were a huge hit and since I didn't have a ton invested in them,
 I could easily say, take the vases with you!! They made for great door prizes!

So how did I make them?

Well, it wasn't hard and you might even say it would be fun if you weren't making 50 at a time and on a very short schedule.  The most important tip that I can give you is do this WAY ahead of when you need them.  I painted on Thursday, let them drain three separate times and then finally turned them back over Friday morning and they dried until Monday afternoon.  But still there was wet paint in the bottom of the vase.
Oh well.
  1. Collect cheap glass vases.  I gathered up the used vases that I could find and then went to the dollar store and purchased another 25.  Rinse and dry.
  2. Gather up all the remnant craft acrylic paint from around the house.  I used all I had and then purchased some cheapo acrylic from the craft section at Walmart.  I bought a variety of paints, but only the cheap ones. 
  3. Clean off a section where you want to work. Put down something to protect the surface and you are ready to begin.
  4. Now, I knew that this was to be a big impact, not archival type project, so I didn't use any surface conditioner or anything fancy.  If I wanted these to last forever, I would either get the surface conditioner that you put in acrylics or buy glass enamel paints. 
  5. Choose a paint and squirt/dribble some paint on the side of the container and let it run down into the vase.  Swirl it around. If you want multiple colors, add the other colors and swirl.  Do not wait until one coat has set. Do all colors at one time.
  6. Once the container is coated, let it sit with the paint pooling in the bottom of the vase for a minute or so, then turn it upside down and let the paint run out.  I place one vase on top of the other as to not waste paint.  You will be shocked at how much paint will run out.  If you place it on a board/paper towel, you will have a big puddle of paint to reuse (or toss).
  7. After the vase sits for about 15 minutes upside down, turn it back over and fill in any areas that you don't like. Give the vase a while to set up, maybe an hour or two.. maybe overnight.. if you are running out of time, 15 minutes... Then turn it upside down AGAIN!  Yes, I'm lucky that I have a drying cabinet!! Don't know where I would have stored them all otherwise!
  8. Finally, turn the vases back up and leave them alone. For a long time!  Notice that I purposely left spots of the vase clear.  I like the "artsy" look of it! 

And just in case in all my wordiness you forgot what the vases looked like with a flower in it below are more samples.  My last tip... don't put water in the vase until the paint has had time to cure.  In fact, I wouldn't suggest EVER putting water in it unless you use appropriate paint.  For last night, we just dropped clear solo cups down into the vases that had large enough openings. We didn't use water though! The event was pretty short so I didn't worry about the flowers wilting prior to the end of the evening.

And now, finally, enjoy.