Showing posts with label Close to My Heart. Show all posts

Friday, May 10, 2013

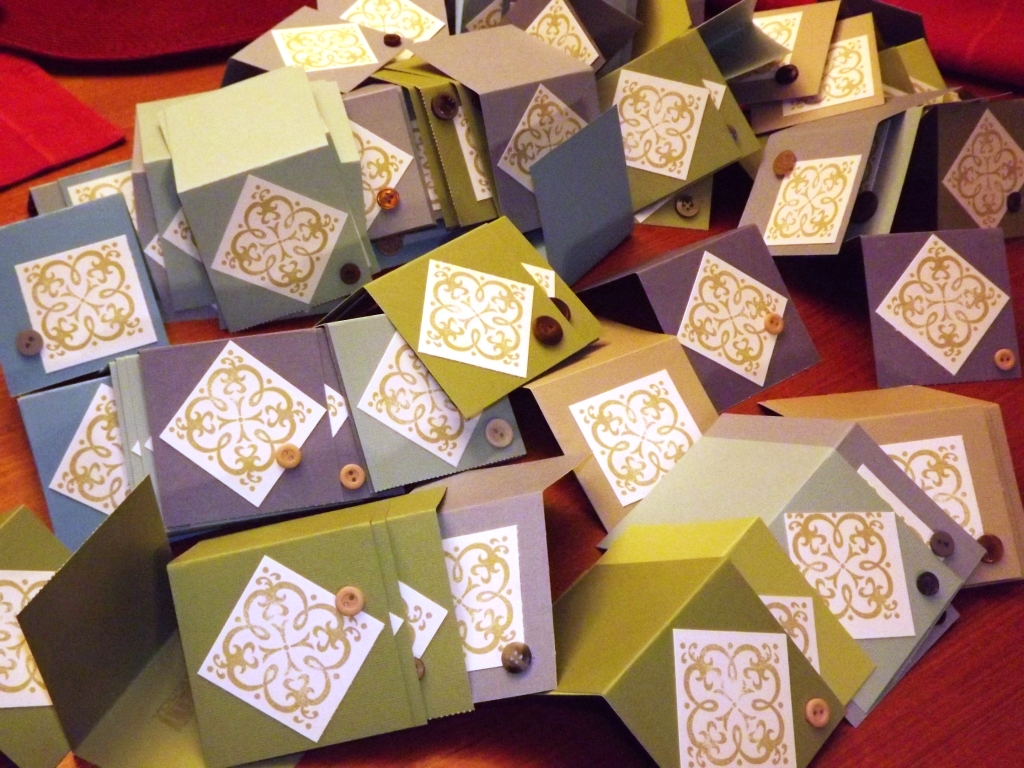
136 cards in 2 1/2 hours

Since moving into our new house, I haven't had a place to create or craft. The house is wonderful and everything our family needed, but I lost my craft desk and space. sad face. Last night I was feeling blah and just needed to create something!

In honor of Teacher Appreciation Week and feeling left out since high school teachers don't get the love that elementary teachers receive. We get a paycheck, that's about all the love we get. (told you I was blah) I decided to make cards for my fellow high school staff members. I've done this before, but not in a couple of years?? wow. that's a long time.

So.. back to the cards. I got everything out and at 8pm started making cards. I had helpers that asked lots of questions and wanted to touch things. But I'm pretty efficient and started cutting paper. I make 3"x3" cards as they are cute, cost effective and they fit in our mailboxes at school.

If you plan on ever making bulk cards, I suggest cutting the paper first. I randomly chose paper that kinda of coordinated, but really I just wanted all of the cards to look decent with one color of ink. Simplicity is the key to bulk cards! Cut all of the 3"x6" strips and then the 2"x2" accent paper. Then fold the cards.

Next get ready to stamp. I stamped the sentiment first. I knew the sentiment that I wanted, but it took me a few different tries to decide on my accent stamp.


Next I stamped the accent stamp and then flipped the pieces over, applied tape to 20 or 30 squares at a time and adhered to the front. I varied the placement on the front of the card.

Now that the cards are made, it's time to embellish.


It is important at this point to just go with the flow. I use glue dots and just put coordinating buttons on the roll of glue dots about 20 at a time. Pick up a button and put it on the card. DO NOT LINGER on this step :)!!

And there you have it. 136 cards in 2 hours.

This morning, I ran to the store and picked up a bag of mixed chocolate miniatures. These are perfect for the inside of these cards. I rolled the glue runner on about 20 cards at a time and slapped a piece of candy down.


 And there you go!
All in it was about 2 1/2 hours. Not bad for a last minute project!

Paper, stamps and ink are Close To My Heart.

Monday, May 21, 2012

If Scrapbooking was an Olympic Sport!

If Scrapbooking was an Olympic Sport.. I think I could be a medalist!

We have two teachers having baby showers tomorrow, so.. you know it.. two scrapbooks!

First is the one for baby boy.  The desired color scheme was blues, greens, khaki and white.  I was thrilled when I found this paper!  In fact, it came in a little paperpack, so I bought two of them to get 12 sheets of matching cardstock and made the pages. The bonus here is that there were boy stickers with the paper pack!!

In the above picture, I used a ton of eyelets and put them in the polka dots at random intervals.

Can you see the buckle on the left picture? I love it!

These brad things are self adhesive. I love them. So easy!

The safety pins are holding on elastic!  It is really fun in person! I can just see this page about a Growing Boy!! Wouldn't that be super cute :) ?

The second album was for a baby girl.  The colors here were brown and turquoise.  This was harder!
But, I found a pattern that was great and went from there.  
 I love the whimsy yet elegant look of these two colors together with the silver!

 More of those self adhesive bradlets!

 The embellishment here is glittered clips!


 Ribbon on these!! I can't make an album without using ribbon!!

And finally, more sticky buttony things!

And there you have it. My favorite baby gift! Total time spent? Two hours. And no, I didn't make all the pages from "scratch." I used my Close To My Heart layout books for most of the pages, but I make a habit of ALWAYS using scraps to make more pages, so a few are my own spur of the moment designs.

Monday, May 7, 2012

Why I think all mom's should scrapbook :)

Proof Positive of why I love to scrapbook!!

Don't you just love these pages.  It makes my heart go a flutter. Granted they are my children, but I just love making memories and then putting them on paper.  My girls love looking at the books and it's almost like we are making the memory again!

I know. I'm a cheezeball.

One really cool thing about scrapbooking is the instant gratification you get looking at a page.  No, I'm not even close to being current on my scrapbooking.  Do I have pages of Lexi or Kylie made as a baby?  A few. But no worries. I scrapbook what I want with what I have and will worry about the rest later!

Here are the bluebonnet pictures from a few weeks ago. I went to my monthly scrapbook class Friday night and we made the base layout that I used for Maddie and Kylie's pages. The rest of the pages were "scraps"!! Yippee... The four little pages will be insert pages on Kylie's larger page.

All the paper and embellishments are Close To My Heart. 

Enjoy the pages and I hope they make your heart smile like they do mine!


Tuesday, April 3, 2012

A Few HandMade Quick Card How-to's and tips!

WARNING!

IF YOU ARE NOT A CRAFTER,
YOU WILL WANT TO SKIP THIS POST!!

For the rest of you, here are a few how-to's
and tips for fast and easy handmade cards using scraps.

Here are few pictures of the finished cards. I made 12 cards using only the scraps from a set of pages I made. I don't think they look like cards made from leftovers!

In order to get the quantity of scraps for the cards, I had to make some pages :) Here are the pages. I used one paper pack (it had 12 pattern papers and 10 cardstock plus I used an assortment of base pages.) This made 26 12x12 pages, or 13 layouts. For more information on how I do that, search page patterns in my search bar!

  1. After taking pictures of my pages and ooh and ahhing over more picture ready pages, I started with my stack of scraps. Sort the scraps into groups according to WIDTH!
  2. Any piece that has a width of 4" or more I put back into my bag. I consider this to be too big to waste on a card. I might use it later, but it's a keeper for a scrapbook page in my opinion!
  3. Now, I take my pile of 2" scraps and sort those according to pattern and color. This is the pile I start with when making cards.
  4. Once sorted, I pick up a 2" piece and glue it onto a card base. No real thinking goes on here.  I will cut it to size in one direction, but I really do just try to only make one cut per piece of paper at this stage of card making. By doing this, in a matter of a minute I have card bases ready to go!
  5. Now, add a pop of interest by using up first the remainder larger scraps and then go to the 1/2" and 1" stacks to tie two different patterns together or for just a fun band. The key at this stage is to make a nice looking card, but to not spend more than a minute on the layout. We aren't making award winning card designs here. We are a making a dozen cards in flash!
  6. With the 12 card bases ready, I then look for a few stamps to use and try my best to keep it to only 2 or 3 different stamps and inks.
  7. I stamp the sentiment on the card sometimes, but I happen to be really, really bad at placement and smudging. So, I have learned to stamp on another piece of paper and glue. Besides, I think it looks nice when the sentiment is layered. :)
  8. Finally, I spend most of the time embellishing the cards. Over the years, I have made LOTS AND LOTS of heavily embellished and thick cards, but they then don't fit in the envelope very well and it's expensive to mail them.  So, I try to just embellish with flat things or try to keep it somewhat simple.  As you would guess, I only use what's readily available.  I'm not going to go out and buy coordinating ribbon for my cards! That would ruin the free factor!
  9. So there you have it. My completed cards. Because I can only do a couple of things at a time and have to referee children, or cook or clean or whatever, I can't tell you how much time was spent making the cards, but probably no more than 2 hours total if I had to guess to make 12 cards! Not bad!! And even better, my premade card box has been refilled!

And here is one last look at the set of stuff.

12 cards.

26 pages

and a bag of scraps to use when I put pictures on my pages.

Papers and Stamps: Close To My Heart

Friday, March 30, 2012

A Dozen Handmade Cards

I've had an unexpected few days at home. Kylie and Lexi both have the flu and so not only am I not working, but I am TRAPPED inside my house!

So far I have cooked, cleaned, made a pathetic video, read a couple of books and made a stack of scrapbook pages. With the leftovers, I made the cards below.  This is the first time I've made cards in probably a year, and it was a nice change of pace. I like using up scraps of paper and embellishments. I may spend money on crafts, but when it comes down to it, I am very thrifty! Kinda nice to say that 12 cards made and not a dollar spent! (well, lots of dollars were spent at other times, but not specifically for this project!)


All the papers and stamps are from Close To My Heart. The embellishments come from here, there and maybe even a button or two from an old outfit!
I thinking of giving this set of cards away. What do you think? And would you use them?

Wednesday, October 19, 2011

Scrapbooking Made Easy, it's all in the Method!

As you all know by now, I'm a busy woman.

So I have had to figure out how to streamline some things along the way.

One of those is basic scrapbook pages.
By streamlining the method of creation, I have more time for my favorite part...

EMBELLISHMENTS!

So while you may be tired of my preaching easy scrapbook pages, I just can't stop myself :)

To start, choose 10 patterns and 12 pieces of cardstock that go together. 
Plus you will need base pages of white or cream depending on your color scheme.
 Here are my chosen pages.
Notice that my pieces of cardstock are really papers with a dominant color and a small pattern!!

The next step is to choose a set of page layouts that you like.  
Most of mine templates are taken from Close To My Heart's template books.
In fact, all of the layouts for this set come from Imagine.

To be honest, one of my very strange quirks is that I LOVE to take the layouts and place them on paper
and see how many layouts I can make with a little paper as possible. 

So while some of you might groan, I live for graphing paper!!

Once I have my cutting guides ready, I cut the paper.  The biggest part of the learning curve is to
 NOT STRESS over which page is which!
It's all part of the game.

As you cut your paper, label each piece in pencil and then when finished sort into piles.
Below you can see my pieces sorted with white between each grouping.
The first time you do this, it will take some work. 
You won't like some of the pages. 
In the midst of trying to figure out what to do you, you will be taking my name in vain!

But when you figure it out, well...

Then it is FUN!!

All of the above layouts were pieced and placed in the span of about three hours.

That's 18 12x12 pages.

That's enough to fill a gift book.

Plus, I had a good bit of scrap paper to use for journal blocks, embellishments and so forth.

So, if you haven't tried this type of scrapbooking, try it!

In fact, I'll teach you how.

Stay tuned for more details....

Monday, September 20, 2010

Just Because You’re the Best Cards

just becasue cards 005_C
just becasue cards 009c

I love making 3”x3” cards.  They are fun and quick and just cute :)

So I made a lot of them.  I love passing them out in the teacher’s boxes at school.  It’s fun to see them smile.  Some people know it’s me and sometimes I’ve even signed them.  But I really like just being a little more anonymous.  Sometimes they go in the trash, but some people still have some of the cards I made a few years ago.

If you have a little time on your hands and want to make a little project, go cut some paper to 3”x6”, fold it in half and get stamping.  These cards are more involved than some I have done as they have 5 stamps, an embellishment, and a candy, but really once you get a system down it’s not a cumbersome project.  In fact, I really enjoy using up my scraps and finding cute uses for some unused yarn and brads. 

Have a great week and I hope you find time for a little crafting!!

just becasue cards 024cjust becasue cards 006cjust becasue cards 015c just becasue cards 021c

Supplies: CTMH Damask Tiles, Say it in Style, and Good Work stamps.  CTMH Petal ink. Purple assorted flowers and yarn.  Silver and white assorted brads.