Saturday, March 17, 2012

The alLUREing necklace tutorial

I am not a fisher woman.
And while I have been fishing a couple of times,
I wouldn't know where to begin if I had to buy a lure in order to catch a fish!

How did I decide on a fishing lure necklace?
Well, I saw a necklace made from "wobblers" in a book.
It was bright and colorful and looked fun.
I also needed to make a thank you gift for a friend and I didn't want a traditional gift!

So....I went to Walmart to look for "wobblers". They didn't have any.
Granted, I don't know what a "wobbler" looked like, but I didn't see anything named as such.

If we lived in a big city where there are sporting goods stores and the like,
I might have found what I was looking for, but we don't.
And given that improvise is my middle name.
And that I was just looking for good colors,
I settled on these fine lures.
And of course a chain (well 2 really), some jump rings.
I already had beads and the silver straight pin type things you put beads on.

Okay.. now for the tutorial!

1.Your cute little jewelry tools will NOT work for this project! I had to go dig out my husbands cutters and needle nose pliers. The hooks are HARD to cut off!

2. After trying a number of different ways to cut off the hook, I finally settled on cutting open the end the hook was placed on and not the hook itself. The picture below shows this. (once you cut open the end, you can pull off the twisted piece if you want. I tried to just untwist the wire, but I couldn't without hooking my finger on one of the THREE hooks! OUCH!)


3. Now the fun part!! After you take off all the hooks, decide on the beads you want to use and make the ends of the lures pretty!  I used the opening that I cut open and then just closed it around the bead addition.


4. After the lures were finished, (I used 4 of two different kinds and 1 larger one) I got my 2 chains and made them into one necklace about 28" long (not sure on length.. original was 22" plus a portion of the second to make it long enough to be able to put over your head).

5. I put the largest lure on first. I used two jump rings on each lure. Two reasons.. first I hate that many "custom" or "homemade" necklaces fall apart so easily and I wanted to make sure that the lures would stay on the necklace. Second, I liked how it looked. :)

6. I placed the lures on every fifth ring. No reason. I just liked the open four between each lure. Because they are pretty big, I didn't want them sitting right on top of each other.


 7. And there you have it! The finished necklace!


I'm not sure if the necklace is very practical, but it sure was fun to make.
I'm going to be on the look out for some "wobblers" and maybe make a couple more gifts!

Wednesday, March 14, 2012

Isn't it alLUREing!!

I can't wait to tell you all about a thank you gift I made today.
And while I don't think the recipient reads my blog,
I won't post pictures of the finished piece just in case she does!

But here is a little up close shot of part of it!!!

Isn't it alLUREing!!
Doesn't it make you wanna go out and catch one?
How do you like that for bait?

I know. I'm lame.

Hopefully, I can deliver the gift and post the tutorial soon!

Sunday, March 11, 2012

15 days, 26 bags. storage wars. and a little reward.

40 Bags in 40 Days. 
Day 15 update.
(if you don't know what I'm referring too, click here)

We are going like gang-busters here!!
It is FUN!

Okay, maybe the rest of my family isn't having the same fun I am having, but I totally enjoy sorting and organizing things. So, for me, cleaning out closets, going through boxes and all that is required to do the 40 Bags in 40 days is rather enjoyable.

hmm... enjoyable. that truly might make me certifiable :)

In case you were wondering, I haven't been going in order on my list. I made the list to give me a point of reference, but since I knew we had a garage sale that was happening last weekend, I started with the good selling stuff. Like kids clothes!

As I sorted the kids clothes, the kids helped by trying on things and pleading their case for a few of the outgrown but favorites.With the age/size spread of my kids, it doesn't make sense to keep all the clothes that Maddie can't wear. It could be years before Lexi would wear something and a decade before Kylie would wear it!  So, I keep jeans and a few of the shirts/dresses that I like.

During these two weeks, I have cleaned out my clothes, dresser and closet and Doug cleaned out his closet yesterday! Yippee! We are on a roll!

Next up, STORAGE WARS!! Here is what I've decided. It doesn't matter how much or how little storage you have for memorabilia/school keepsakes/special items. You will never have enough! UGH! 3 kids make for a TON of school keepsakes. I have these wonderful school keepsake files that I made a few years ago, but since we've lived in uncertainty on housing over the years, the boxes have been put away and the papers from school have just been piling up! So..yesterday, I started this.So far, I have 2011 sorted and one bag of trash. That's pretty good. I've got a long way to go. But it's spring break and raining, so I have time!

 And finally, why do this? Besides of course the deeper meaning of the 40 bags in 40 days clean out. When you clean things out, you have room to DECORATE!! Doesn't my china cabinet look nice!


I've decided that I'm going to use my china. I have beautiful ivory china with a gold rim. This makes it not suitable for the dishwasher. BOO. However, after 13 years, I've decided that china in perfect condition that is never used is not the point. I'm gonna use the china and if the gold rim wears off, good! 

Saturday, March 10, 2012

To South Africa and Beyond!

My 16 year old nephew Carter in the picture above left for a mission trip to South Africa yesterday!  WOW and amazing. If you would like to read the back story from my sister's blog, click here. I think one of the coolest things about what Carter is doing is that he is serving in an area where he can be truly used.  He's not just doing something that is going to make him feel good.

This is not Carter's first trip either. He has been abroad with his mom and then done things in Texas with his dad.

So... it makes me think about Maddie and kids with special needs. How do they get opportunities to serve others beyond their local communities?

Maddie loves to serve others. She helps at school and church. She loves "teaching" (being in charge). But when you put all of the restrictions on what Maddie and others with limitations can do, where do they fit in the broader sense of mission trips?

I know, I know.... we do mission trips because there is a need somewhere, not so that my privilege kid can gain life experience,  BUT....

Maybe some of you out there have an idea?

Wednesday, March 7, 2012

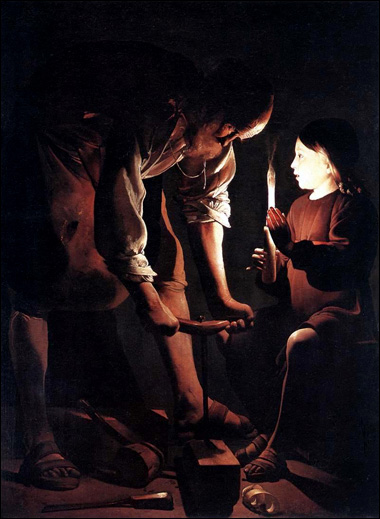
Dark vs Light. Applications in life and art

Dark and Light. Applications in Life and Art.

Chiaroscuro
1.The treatment of light and shade in drawing and painting.

2.An effect of contrasted light and shadow created by light falling unevenly or from a particular direction on something.

Here are two wonderful examples of this technique.
St Joseph the Carpenter by Georges de La Tour

Self Portrait Rembrandt
As seen in the above examples, neither painting would be as effective if the dark wasn't so dark and if the light wasn't as bright. This effect is called Chiaroscuro in art.

Painting very dark with a punch of light is risky. Once you decide on where the light is, it's gotta be bright.  Many students want to use just the middle shades so that things blend in more. But if you only use the middle shades, the entire painting is boring.

The effect of the darkest dark next to the lightest light is eye-catching and interesting. There is a reason spot lights are used in theatre. That dark stage with a pop of bright white; it gets the audiences attention.

While working on this post, I went back to look at photos to see if I could find that one perfect piece that would give you a modern example of what I'm talking about. But, Nope. Don't have one.  My mom took a picture of my nephew as an newborn 16 years ago and it is a perfect example. Sorry, I don't have a digital copy. Really, it's kind of fitting. The concept of Chiaroscuro isn't complex, we just forget about it.  In the end, I had a couple of decent examples, that use dark and light, so here you are. :)


Now that you had your art lesson, you might be wondering how this applies to life.  Well... here are my two cents!

Sometime dark times are bad times. Sometimes dark times are lonely times. Sometimes dark times are times when things aren't going the way we had hoped. Sometimes is because we aren't sure where to go. Sometimes it just feels like you are treading water at night.

Yet, what I find most interesting about the dark times is that there can be some very good stuff hidden in the darkness. If you put this art terms again, some of the most beautiful art pieces have all kinds of texture and incredible meaning buried in the depths of a painting. You just have to learn how to see in the dark! 

As a theatre person, I have spent countless hours in the dark.  I could walk through a pitch black theatre with all kinds of stuff back stage and not trip. I knew where the stuff was sure, but more than that, I had learned how to see in the dark.

Lately, I have felt like I have lost that ability.  I know that there is all kinds of good stuff waiting for me, but I had lost it in the darkness. Between job pressures, sick kids and putting a parent in an assisted living facility and all that entailed, life felt dark. Let me clarify for a second... not bad, just all one shade of boring grey.

However, I can say that I figured out what to do. I bought a flashlight. Okay, not figuratively. But I felt like I did. As I posted a few days ago about needing clarity and telling God to please speak... I figured it out. Or maybe God revealed. When you have a flashlight, you are breaking the darkness.  Where you break the darkness is your choice. You can shine it directly in front of your feet so that you can make sure you don't trip on something. You can shine it on your face and scare others and give yourself a headache. You can keep it at your side and not turn it on. Or can choose to aim the beam of light ahead of you and let it cast a path of light for you.  The thing with a flashlight is that you aren't getting rid of the darkness, you are CHOOSING where to highlight the contrast of light and dark! 

Yep, it's totally cheezy. But instead of focusing on the issues at hand, I decided to focus on what I wanted to see as a result. Where did I want to go? What did I want to do? What did I want to choose to highlight by having my light touch it. Did I want to waste the light by having it focus on an issue that I can't control? Put in terms like that, it was pretty easy to say NO! I'm not wasting my light on that!!

Here is what I chose. Pretty smart I think!